So i'm coming to the end of the module and its been a learning curve…
I have never printed on to fabric before which was an experience but in a good way. I've have used appliqué many times in the past but never to the extend of what I have learnt in the module and never ever made my own bonded fabric. My biggest obstacle is without a doubt the deign parts of the unit. This has never been my strong point in life but I managed it and came out the other side unscathed :) I'm looking forward to challenging myself more on this topic.
Overall I'm quite pleased how module one has panned out. Its made me realise I need to have more thought in my designs and take more time to consider different options. I'm very quick to jump to the first idea I have and then dive straight in but then I guess that issue goes back to challenging my design and ideas.
Ami James
My creative journey towards City & Guilds Embroidery Certificate - Level Three
Tuesday, 29 March 2016
Resolved Sample - 2nd Attempt
After my last attempt of the resolved sample both myself and Sian decided that the lovely blue shiny fabric I used was probably not the best idea.
After having a few days off I decided to take a different approach.
I went back to the drawing board so to speak…..
After having a few days off I decided to take a different approach.
I went back to the drawing board so to speak…..
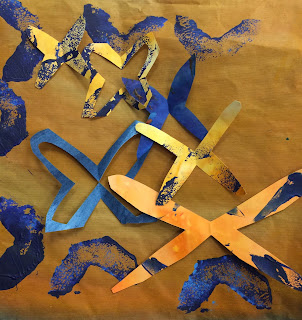
I changed design ideas and motif shape.
I then changed my fabrics - For the base fabric I decided to go with organza bonded on to a plain cotton fabric. The organza has been lightly stamped with paint in previous chapters. I also decided to use chiffon for the appliqué parts of the design.
As you can see the only part I haven't changed are the colour schemes.
I have used appliqué, reverse appliqué, machine and hand stitched disintegration. I have used more hand stitching on this sample - random seed stitching, directional seed stitching, cross stitch and french knots using perle thread, metallic thread and crewel yarn.
Afterwards Sian suggested I added more stitching the the biggest star….
I've mounted my sample on a 10'x10' canvas board which a lace at the back to secure using strong thread and a curve hand sewing needle.
Thursday, 17 March 2016
Hours & Costs
Module One Hours -
Chapter 1 - 12 hours
Chapter 2 - 4.5 hours
Chapter 3 - 10 hours
Chapter 4 - 13 hours
Chapter 5 - 6 hours
Chapter 6 - 18.5 hours
Chapter 7 - 22.5 hours
Chapter 8 - 25 hours
Chapter 9 - 17.5 hours
Chapter 10 - 12 hours
Chapter 11 - 42 hours
Chapter 12 & Resolved Sample - 8hours
Chapter 13 - 2.5 hours
TOTAL HOURS - 151.5 hours
TOTAL COSTS (for materials) - £30.82
I found it very useful to purchase a magnetic whiteboard and storage for my work which added another £30.00 to the cost.
Making the TOTAL COST £60.82
Chapter 13 - Study of Three Artists.
Herta Puls - 1915 -
Herta Puls studied embroidery in Wales and the West of England and has written several books on the work of the Kuna Indians of Panama. The San Blas Archipelago is a chain of islands off the coast of Panama only a few of the islands are inhabited and are the home to the Kuna Indians.
The women of this region use a layered appliqué method to produce beautiful textile works known as Molas. A Mola is a fabric panel that is used in the making of their traditional smock like blouses. They are worked using light weight plain cotton fabrics in bright colours, and often depict patterns and picture from their cultural traditions.
This kind of cut work and appliqué is worked by hand, many layers of fabric are intricately cut away and neatly turned under and hand stitched down. This reveals the different colours beneath. Animals, birds and plants are among the favourite subjects for these panels. The more traditional Molas are pure ‘reverse appliqué’ a term Herta Puls was not entirely happy with to describe the Kuna Indians work.
Kandinsky 1866-1944
Kandinsky was born in Russia, Moscow and studied law. He started painting at the age of 30 and is widely attributed with painting some of the first modern abstract works. He studied art in Munich and was clearly an artist moved by colour rather than details, his early works took on an impressionists forms of blurred shapes that were left to the viewer to interpreted.
After the war Kandinsky returned to Russia where he met and married his wife Nina. In 1922 he returned to Germany to teach and developed his style. This was a prolific time in his career he produce many works using geometrical shapes and spaces. With increasing pressure on the artistic community from the German Authorities Kandinsky moved to France where he settled in Paris. Kandinsky wrote many books and was a firm believer that spirituality and music had a bearing on his work
Information from <http://en.wikipedia.org/wiki/Wassily_Kandinsky>
I've picked out my favourite pieces below -
 |
| On White II, 1923 |
 |
| Soft Hard, 1927 |
 |
| Points, 1920, 110.3 × 91.8 cm, Ohara Museum of Art |
For my own choice I wanted to find an artist that covered a technique in the module.
As soon as I came across Ren Gengshun I was memorised by his work. Mark marking using a soldering iron.
Information taken from http://www.chinadaily.com.cn/culture/art/2014-12/11/content_19060064.htm
Resolved Sample
First I sketched out what a wanted my resolved sample to look like….
 |
| sketched design |
I wanted to incorporate my favourite techniques I have learnt throughout module one….
Using positive and negative shapes, bonded bits of fabrics, appliqué, hand stitching, machine stitching and reverse appliqué.
The fabrics I have chosen is still in the theme of my chosen colour scheme earlier in the module and all the fabrics I have used where printed by me.
 |
| Resolved Sample |
 |
| Resolved Sample |
 |
| Resolved Sample |
On relflection, as much as I love the shiny material it was a lot harder to work with but I still love the effect.
Tuesday, 8 March 2016
Chapter 12 - DIFFERENT WAYS OF USING THE SHAPES TO SHOW DISINTEGRATION
I have made up paper mock samples to see which arrangements I like for my resolved sample.
First sample - I'm not particularly keen on this one but I wanted to uploaded it.
 |
| I like this design with positive/growth and negative/distintegration shapes with the smaller shapes disappearing into the background. |
 |
| I also like this design the main large positive shape taking centre stage and the others merging into the background. |
 |
| I like this design the best - with 9 shaped grid with the main shape taking up two spaces on the grid. I await for Sian's input :) x |
Chapter 11 - Growth & Disintegration
First Thoughts - Paper Experiments
On samples 11.1 through to 11.4 I experimented disintegration using paper. I used different methods such as ripping, tearing, crumbling, hole punching, pin pricks, cutting, scorching, folding, slashing, stabbing, burning and soaking.
All of the methods created a different effect regarding textures and visual differences.
 |
| 11.1 |
 |
| 11.2 |
 |
| 11.3 |
 |
| 11.4 |
Second Thoughts - Paper Shapes
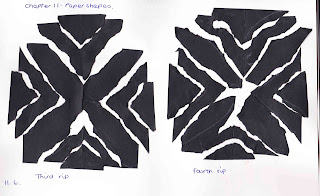
Pages 11.5 through to 11.8 are my samples of ripping a shape up into segments, however after I had finished I had a go at cutting the segments just to see what differences it would make.
 |
| 11.5 |
 |
| 11.6 |
 |
| 11.7 |
 |
| 11.8 |
Surprisingly after I preferred the dramatic change on the previous samples I have to say I do prefer the cut and neater version in this experiment.
My next sample page I have used techniques from this chapter to make more disintegrated paper shapes. I have used negative and positive shapes on this page.
 |
| 11.9 |
Third Thoughts - Fabric Shapes
Sample pages 11.10 through to 11.15 - Such interesting effects. I experimented with positive and negative shapes using muslim. Taking time to fray……which is very therapeutic.
 |
| 11.10 |
 |
| 11.11 |
 |
| 11.12 |
 |
| 11.13 |
 |
| 11.14 |
 |
| 11.15 |
Again I like all of the samples however my favourite has to be the last page ( bonded fabric ). I love the visual effects of these two samples.
Fourth Thoughts - Stitched Shapes
Pages 11.16 through to 11.22.
This was so much fun. I started with hand stitching the first samples that you can see and try again afterwards using machine stitching.
 |
| 11.16 |
 |
| 11.17 |
 |
| 11.18 |
 |
| 11.19 |
I preferred the hand stitched samples using seed stitch. The machine stitched samples are still effective though. Instead of free machining I picked a decorative stitch.
Additional Samples
Pages 11.20 through to 11.22 - I used different techniques using the methods I have learnt through this module. Slashing, reverse appliqué using a soldering iron and bonded fabrics.
 |
| 11.20 |
 |
| 11.21 |
 |
| 11.22 |
This chapter has been amazing, so many techniques and experiments to sink my teeth into. I've learnt so much. I probably have spent way too long on this chapter but I felt I needed to take my time.
Time spent - 42 Hours.
Cost Occurred - Black card - .150 - Muslim - 3.00
Total Cost - 4.50
Subscribe to:
Comments (Atom)


