Ami James

My creative journey towards City & Guilds Embroidery Certificate - Level Three

Saturday, 30 January 2016

Chapter Six - Use of Bonding in Applique


For this chapter I used sheets of Bondaweb.

I followed the method of -

Ironing the glue side (using baking parchment) on to the back of the fabric.
Cutting the desired shapes.
Peeling of the backing paper
Placing the cut shape on to the background
Iron in to place.

I used lots of different materials in the orange and blue colour scheme and with lots of different textures.

Felts
Dress net
Satin
Cotton
Organza
Chiffon
Even weave
Merino felt tops
Sequins
Embroidery Thread
Wool and Yarns
Pom Poms
Crumbled tissue paper
Perle threads.
6.1 - The first sample on this page didn't bond successfully because of the thickness of the fabrics used. 


6.2

6.3


Next up are my bonded fabrics with bits.

Felt backing, cotton fabric bits, yarn, perle thread and sequins with organza top.

Cotton background- lace, pom poms,, yarn, metallic thread, perle thread, embroidery threads, sequins with organza top.

Crumbled tissue paper backing - dark blue yarn with tissue paper on top.

Organza front and back with merino felt tops and sequins - needed more adhesive 

Painted Bondaweb with acrylics

Painted Bondaweb with acrylics and metallic gold paint

Printed denim sample with bonaweb painted shapes ironed on.


Next are my design using the decorative bonded fabrics I made.

6.5

6.5


Material Cost - Acrylic Paints - £1.75
Sheets of Bondawab - £5.55

Total - £7.30

Time Taken - 18.5 hrs.

I have really enjoyed this chapter. Its probably taken me a little longer than I thought but its been so interesting.


Saturday, 23 January 2016

Chapter Five - Selecting & Decorating Fabrics

When I read through this chapter I just knew I was going to enjoy it, and I certainly did.

So I started off by rummaging through my fabric stash for fabrics that matched my colour scheme I selected as well as finding out acrylic paints.


I had managed to find quite a lot and I found I had a good mix and fabrics with texture differences so I was keen to see how they coped with printing.

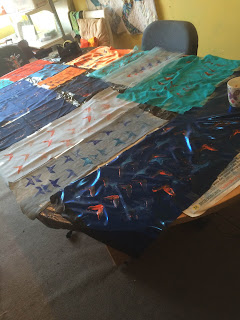
I used cotton, denims, even weave, chiffon, organza, dress net, felt, satin and some blue stretchy shiny stuff that I found hiding away.

I'm lucky to have a large table which I cover in plastic and taped down.

mid way through printing


I used my three stamps from the previous chapters and stuck to my blue and orange theme. I looked at my prints on paper as my inspiration.

I'm am pleased with the results. Its been really interesting to see how the fabrics like the chiffon, organza and dress net coped. I think they are great in there own rights, the paint seeped through the layers leaving a great textured appearance.

I have taken individual pictures of the samples I think are most impressive. 


I had no costs in this chapter, all the fabric was found in my stash and I also had the acrylic paints.

Time Logged 20/01/2016 -  6 hours - this includes finding fabrics, ironing, setting up the table and printing


Wednesday, 20 January 2016

Chapter 4 - Cut & Fold Design Shapes

I really enjoyed this chapter, I found it very interesting cutting, folding and gluing..... very relaxing and therapeutic.

I started off with the black paper ..... and using symmetrical shapes

* Please note all of my sample pages are displayed on A3 paper. 

4.1


Basic shapes on this first page as I was finding my feet to get a little bit more adventurous. 
4.2
I found this page a lot more interesting as the different shapes started to come out.

4.3
This is one of my favourite page out of the black and white part of this chapter. I like all of the samples and if I had to pick one I'd go with the top left......such an interesting design.


Here I moved on to asymmetrical shapes. 
4.4
4.5

The asymmetrical shapes were a little more challenging, however still as interesting. I'm pleased with all of the samples on these two pages. I also used leftovers to create more shapes and patterns. 

Cut & Fold Designs in Coloured Paper - and what I delight. This fascinated me .....
4.6

Unfortunately my page number written in gold ink does not show up that well on camera. So this page has my symmetrical cuts using papers in my colour scheme. Its amazing what difference it makes form the black and white samples page. 

4.7

And the asymmetrical shapes on this 2nd page really amaze me. I overcame my fear of asymmetrically shapes.
4.8
So I did another asymmetrical sample page. I found the effect of these interesting and unusual. 

Overall I am pleased with these sample pages. I can't wait to see what we do with them further along the module.  I'm amazed by the different looks, patterns and samples that are starting to appear with so little shapes to use.

Cost of Materials -  Glue - £2 - from a hardware store.

Time Log - I probably spent more time than I should be it took me a while to get over symmetrical shapes -

11/1/2016 - 6 hours
12/1/2016 - 3 hours
13/1/2016 - 2 hours
16/1/2016 - 2 hours
TOTAL - 13 HOURS


Wednesday, 6 January 2016

Chapter Three - Design Development Based On Stars


I must admit this Chapter has been a little challenging for me, design is my strong point but by the end of the chapter I did feel inspired to try new things.

All the design sheets are A3 size.

Design Sheet A -

Design Sheet B -

Design Sheet C - 

This was a 2nd attempt at Design Sheet C - My first attempt failed miserably - it just doesn't look right.

Doodles from Design Sheet A

This chapter occurred no extra costs as I already had all paper and glue.

Times wise, well I think I worked quite slowly on this chapter and it has taken me a considerable amount of time to what I expected. But I have enjoyed it and have learnt a lot. 

4/01/2016 - 1.5hrs
5/01/2016 - 6.5hrs
6/01/2016 - 2hrs

Total - 10hours


Monday, 4 January 2016

Chapter Two- Making Coloured Papers

Making Coloured Papers

This chapter has taken me longer due to the Christmas break as I started to work on this chapter in my Sewing Studio which is not at my home.
But with Christmas out of the way I finally got cracking and thoroughly enjoyed it. I admit paints aren't really my specialty so I stuck with the Brusho Inks to make life a bit easier.

So I grabbed the colour chart and ordered - Terra Cotta, Violet, Ultra Marine, OST Blue, Cobalt Blue, Turquoise, Gamboge, Orange and Prussian Blue.

I picked out various different style of papers - tracing paper, brown wrapping paper, kitchen roll, tissue paper, cartridge paper, card, imprinted cards and printer paper.

I made a good stock and selection of blues and oranges.

I used the instructions that came with the Brusho Inks.


Printing onto Coloured Papers

For printing I used a sponge and also a blank rubber stamp which I found in an old card making kit that I had been hoarding for a few years.

I used acrylic paints and I also had an orange ink pad that hadn't been used. I printed vertically, horizontally, diagonally, rotating 45 degrees and randomly. 

This was brown wrapping paper - I used the orange inkpad on the blue and looks more silver than orange in this photo. 
Card and cartridge papers

Tissue paper and tracing papers

Imprinted cards, baking paper

Tissue paper

Printing Paper

Mixing colours by sponging 

Thick card


Star Shapes from Coloured Papers.

I picked Ultramarine and the Orange inks out of my collection. I love this contrast with the coldness of the blue with the warmth and vibrancy of the orange. The orange background is A3 size. 


HEALTH & SAFETY NOTE - I covered all area's of work space with large plastic sheets and whilst colouring and printing I work latex gloves.

Time Log

23/12/2015 - Colouring papers - 1.5hrs
29/12/2015 - Colouring papers - 45mins
2/1/2016 - Printing - 1hrs
3/1/2016 - Cutting stars - 1hr

Cost of materials - Papers of different kinds - £4.00 from Hobbycraft - Brusho Inks - £11.48 - Colour Craft,

On to Chapter 3 :)